Create a general admission event
Use general admission when attendees choose a ticket quantity instead of specific seats. This guide uses a workshop for up to 24 attendees, with one admission price, as an example.
You need permission to manage events and an existing venue. An organization owner can complete these steps. If you need a location first, see Create and edit a venue.
Create the draft
- Open Events and select Create Event.
- Enter Event Name and URL Slug. The slug becomes part of the event's
web address; use a short, readable name such as
community-songwriting. - Choose the Default Venue.
- Add a Short Description for listings and a Full Description for the event page. Include useful details such as arrival time, what to bring, and what attendees can expect.
- Select Create Draft Event.
The event editor opens on Details. Creating the draft does not publish it.
Set seating, capacity, and price
- Open Seating & Pricing.
- Choose General Admission under Seating Type, then select Save Seating Type.
- Under GA Categories, select Add Category.
- Open Category Name, type a name such as “Workshop Admission,” and select the option to create that category name.
- Enter Capacity and select Save for the category.
- Select Add Tier within the saved category. Enter a tier name, such as “Standard,” and select the option to create that name.
- Enter the price and select Save for the tier.
The category's capacity is the maximum number of tickets available in that category. Its price tiers are the ticket choices within that category. Check the saved price and that the category and tier are Enabled before continuing.

For the difference between a set amount and a customer-chosen amount, see Fixed and Variable Minimum Pricing.
Add an event time
- Open Event Times and select Add Event Time.
- Enter the date and time, checking the venue's time zone.
- Select Create Event Time.
- Close the event-time editor to return to the list.
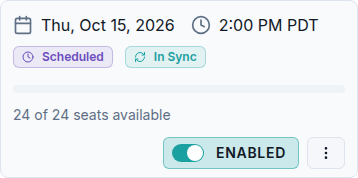
Check the date, time zone, and available capacity on the new event-time card.
To add a banner and listing artwork, change the images in Branding.
Publish and check the attendee page
Select Publish Event. On a phone, open Page actions to find it. The action changes to Unpublish Event after publication.
In Event Times, make sure the time you want to offer is Enabled. If its status control says Disabled, select it to enable that time.
Open the event's public page and check the description and listed date. Select Buy Tickets to confirm that the expected category, price, and ticket quantity controls are available.
If tickets are not available
Check both the event's publication state and the event time's Enabled status. Also check the saved seating type, category capacity, and enabled price tier. Creating a draft or adding an event time alone does not complete all of these steps.
If the editor shows a requirement you cannot resolve, ask your organization administrator for help. Include the event name and the exact message when contacting support.
Before publishing, you can preview the saved draft listing.