Edit seat-map rows
Use row settings to match your venue's seating. You need permission to manage venues. Start with a saved seat map and open its latest version from Venues & Seat Maps.
Select and label the row
- In Structure, select a section to reveal its row buttons.
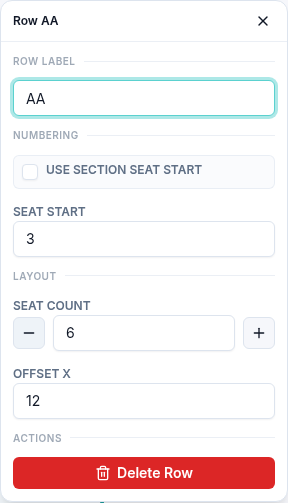
- Select the row, such as A. Its settings appear in the row panel.
- Edit Row label, then press Enter to apply it. Lowercase letters become uppercase.
Each row label must be unique within its section. If you enter another row's label, the editor shows a warning. Press Escape to restore the previous label, or enter a different label. Labels can contain letters, numbers, spaces, and hyphens.
Adjust seats and numbering
- Change Seat count to set the number of seats in that row. The plus and minus buttons add or remove one seat.
- Turn off Use section seat start to set a row-specific Seat start. For example, six seats starting at 3 are numbered 3 through 8.
- Change Offset X to shift that row horizontally relative to the section. Check its alignment against the surrounding rows on the map.
Save and check the result
Select Save. The revised layout becomes a new version. Reopen it and check the row's label, count, numbering, and position before using it for an event time.
Editing the venue map does not automatically replace the seating layout of a event time that already has its own configured seats. Check the event time's seating separately before selling tickets for the revised layout.
If the editor is Read-only, select Open Latest. For a saving problem you cannot resolve, include the map name, version, and message when you contact support.
For numbering direction, new-row defaults, spacing, or skipped row letters, see change section numbering and layout.