General admission events
General admission lets you choose how many tickets to book without selecting individual seats on a map. Complete checkout to confirm your booking; selecting a quantity alone does not confirm your place.
To compare listings first, browse the organizer’s events or browse passes.
Choose an event time
- Open the event on the organizer's site and read its description.
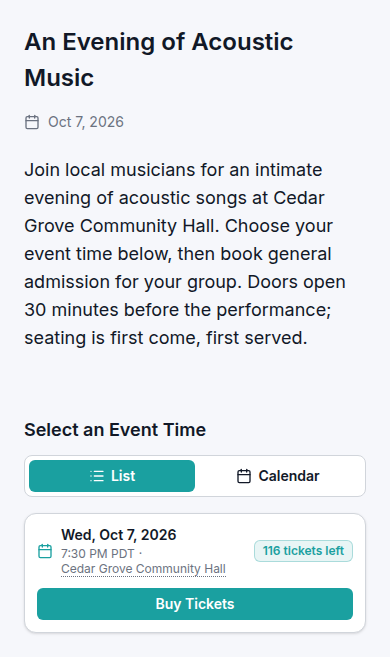
- Under Select an Event Time, check the date, time, and venue.
- Use List to browse event times, or Calendar to choose an available date and see its event times.
- Select Buy Tickets beside the event time you want.
Choose another date when an event time is sold out
An event may have several event times. Sold Out means that date has no tickets available; other dates may still have space.
- Select List to compare the event times and their booking buttons.
- Select Calendar to choose a date. Use the month arrows to look further ahead, then select a day with a scheduled event time.
- Check the date and time beside Buy Tickets before continuing. Your ticket is for the event time you select.
A sold-out date can still appear in the calendar so you can review it. Selecting that date does not reserve a place or join a waiting list. Choose an available date or contact the organizer about your options.
Select your tickets
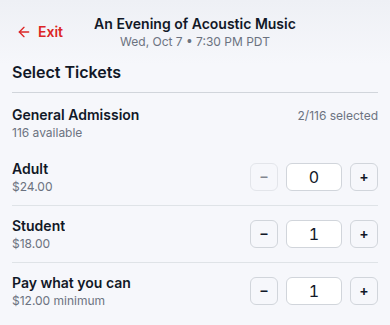
- Find the ticket category you want, such as General Admission.
- Check the available price tiers, such as Adult, Student, or Pay what you can. Follow the organizer's eligibility requirements for discounted tiers.
- Use + beside a tier to add tickets, or enter a quantity in its number field. Use − to reduce the quantity.
- Check each tier's quantity and the selected tickets before continuing.
You can include different tiers in one booking—for example, one Student ticket and one Pay what you can ticket. General admission does not reserve particular seat locations.
Choose an amount for a variable-price ticket
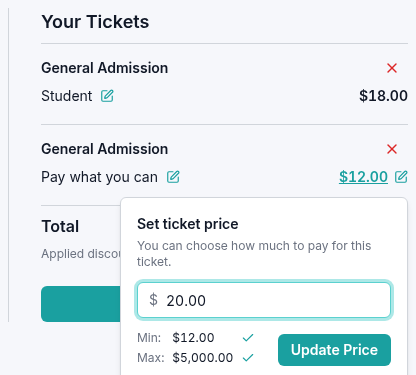
Some tickets let you choose how much to pay, subject to a minimum price set by the organizer. Select the variable-price tier, then review the ticket in your summary. On a phone, open Review Summary to see your selected tickets.
- Select the ticket's price amount with the edit icon. This is separate from the price-tier name and its edit icon.
- In Set ticket price, enter the amount you want to pay for that ticket.
- Check the Min and Max amounts shown. Your amount must be within those limits before you can update it.
- Select Update Price, then check the ticket's updated amount and the total.
The amount applies to that individual ticket. Review each ticket if you want to change more than one, and check the final total including any fees and taxes at checkout.
Review or remove a ticket
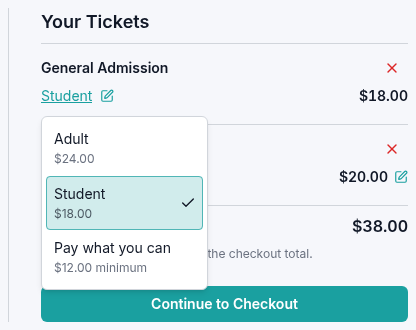
On a computer, Your Tickets appears beside the ticket selection. On a phone, select Review Summary to see it. Each ticket appears separately, with its category, price tier, and amount.
To change a ticket's tier:
- Select the existing tier name with the edit icon in the summary.
- Choose the new tier from the dropdown. Check its price and any eligibility requirements before choosing it.
- Check the updated ticket and total. The change applies to that individual ticket, not every ticket in the booking.
To remove a ticket, select its × control. Screen readers announce Remove followed by the ticket category. Check the remaining tickets and total afterward.
Checkout
Continue to checkout
On a computer, select Continue to Checkout. On a phone, select Review Summary, check Your Tickets, then select Continue.
Apply a promo code
If the organizer gives you a promo code, apply it at checkout before completing the order. The offer must cover your selected tickets or passes.
- Select Got a promo code? Click here.
- Enter the code in Promo code, then select Apply.
- Review the offer name, code, Discount, and updated Total in the order summary. On a phone, expand the summary if needed.
- Check that the discount matches the offer before proceeding. Additional tickets or passes, fees, or taxes may leave an amount to pay.
Entering a code alone does not apply it. To remove or replace it, select Clear promo code (the × beside the applied code), check the updated total, then enter another code and select Apply if needed.
If the final total is zero, select Confirm order after completing your contact details and reviewing the purchase terms. Otherwise, complete payment. An applied discount is not a completed booking: wait for the order confirmation.
If a code does not work, check its spelling and the event, event time, collection, pass option, price tier, and quantity covered by the offer. Codes can expire, become inactive, or reach their usage limits. Contact the organizer before completing the order if the discount is not what you expected.
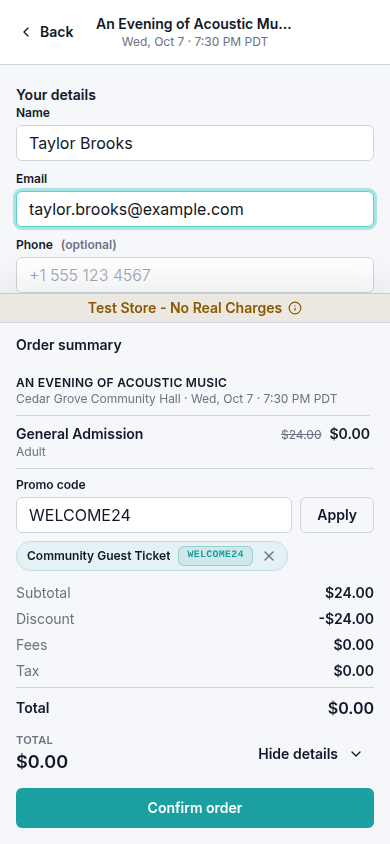
Complete checkout
- Under Your details, enter your Name and Email. Check your email carefully: use this address to access your tickets later. Enter Phone if required; it is optional when the form marks it that way.
- Review your tickets, the final total including any fees and taxes, and the organizer's purchase terms. If you have a code, apply it before paying.
- If payment is due, enter the details for a payment method offered at checkout and select Pay with the amount shown. Complete any verification requested by your payment provider.
- Wait for the order confirmation page and keep your order reference.
If the final total is zero, no card details are needed. Follow Confirm your free order instead of the payment step.
Use the same email address when you open your wallet. Your admission appears under Single Tickets. Before the event, prepare your ticket for check-in.
If checkout does not finish
Follow any error message shown and check your contact details. If payment is rejected, check the payment details or use another method offered at checkout. If you are unsure whether the order completed, check your confirmation email and wallet before placing another order.
Get help with an event or order.
If checkout is interrupted or cannot load, follow Recover an unfinished checkout before starting another purchase.